How to Root and Install (CWM) Recovery on Galaxy S GT-i9000

Tools
• Odin3
• USB Data Cable
• CR-Root Kernal
Procedure
1. First, download CF-Root Kernel.
2. Then, extract it to a new folder via Winzip/Winrar. You should get this file CF-Root-XX_OXA_JVU_2.3.6-v4.3-CWM3RFS.tar
3. Next, download and extract the Odin3 v1.7.zip to get the Odin3 v1.7.exe
4. Turn off your phone.
5. Turn on your phone by pressing Volume_DOWN+Home+Power until a screen saying ‘Download Mode’ comes up.
6. On your computer double-click the Odin3 v1.7.exe to run the program.
7. Connect your phone to the computer using your USB Data Cable.
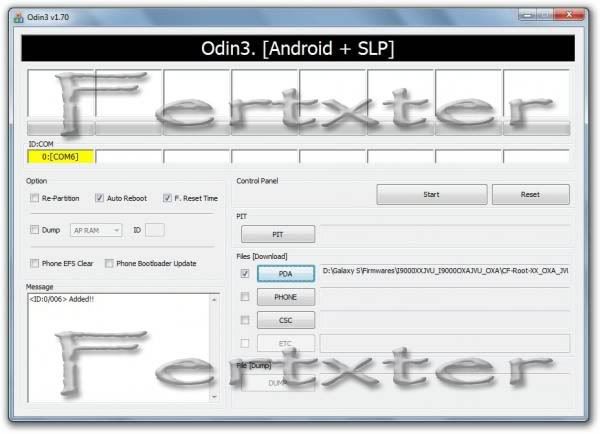
8. The Odin program will recognize your phone and you will see that the ID : COM section will turn yellow, which will mean that all the drivers have been successfully installed.
9. Now, in Odin, Click the PDA Tab, and select CF-Root-XX_OXA_JVU_2.3.6-v4.3-CWM3RFS.tar
10. Make sure to select the Re-Partition, Auto Reboot and F. Reset Time check box in the options.
11. Then, click the START button. Now the rooting process will begin.
12. When finished, your device should restart by itself. Restart it manually if it doesn’t.
13. Wait for the Samsung logo then you can now safely remove your phone to the computer.
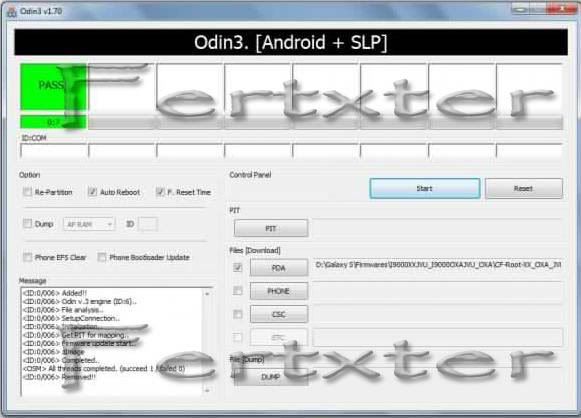
14. If you have successfully rooted your phone, ODIN program should look like this.
15. When you checked your phone you should to 2 new apps, the superuser which means your rooted and CWM which means you have CWM Recovery.
Tools
• Odin3
• USB Data Cable
• CR-Root Kernal
Procedure
1. First, download CF-Root Kernel.
2. Then, extract it to a new folder via Winzip/Winrar. You should get this file CF-Root-XX_OXA_JVU_2.3.6-v4.3-CWM3RFS.tar
3. Next, download and extract the Odin3 v1.7.zip to get the Odin3 v1.7.exe
4. Turn off your phone.
5. Turn on your phone by pressing Volume_DOWN+Home+Power until a screen saying ‘Download Mode’ comes up.
6. On your computer double-click the Odin3 v1.7.exe to run the program.
7. Connect your phone to the computer using your USB Data Cable.
8. The Odin program will recognize your phone and you will see that the ID : COM section will turn yellow, which will mean that all the drivers have been successfully installed.
9. Now, in Odin, Click the PDA Tab, and select CF-Root-XX_OXA_JVU_2.3.6-v4.3-CWM3RFS.tar
10. Make sure to select the Re-Partition, Auto Reboot and F. Reset Time check box in the options.
11. Then, click the START button. Now the rooting process will begin.
12. When finished, your device should restart by itself. Restart it manually if it doesn’t.
13. Wait for the Samsung logo then you can now safely remove your phone to the computer.
14. If you have successfully rooted your phone, ODIN program should look like this.
15. When you checked your phone you should to 2 new apps, the superuser which means your rooted and CWM which means you have CWM Recovery.


No comments:
Post a Comment